In our last post we explored using the RealityServer compositing system to produce imagery for product configurators at scale. Check out that article first if you haven’t already as it contains a great introduction to how the system works. In this follow up post we will explore the possibilities of using the same system to modify the lighting in a scene without having to re-render, allowing us to build a lighting configurator.
For product configurators, the main changes users want to make are material changes namely colours and textures. Light Path Expressions (or LPEs for short) described in the previous post can do much more. They also allow for the separation of specific sources of light. This is actually quite a bit simpler than materials (unless combining both together of course, then it becomes even more complex). As an example, you can separate out a light sources contribution to the final image with an expression like this.
<L['downlight']>.*E
This simple expression will render out only the contributions of the light source with the handle String attribute downlight. Here we are getting the combined contribution (both direct and indirect), you could also craft an expression to separate direct and indirect but typically with lighting configurators you want to change both at the same time in order to be maintain accuracy. Like material and object changes, the compositing system will hide the complexity of these expressions and you just need to specify either the instance names of the lights or the handle names. Let’s take a look at the type of application we can build using composited lighting.
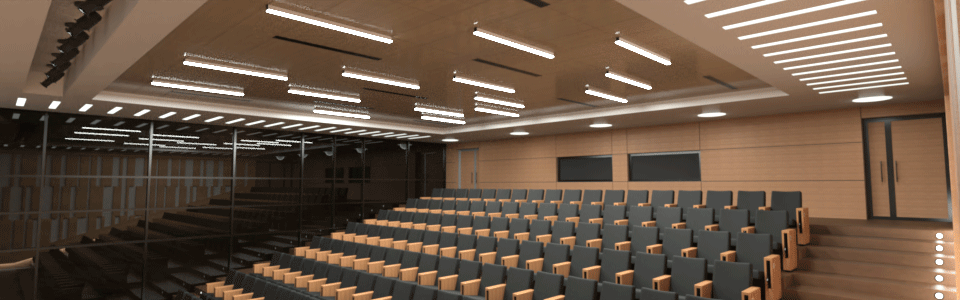
The video below shows a quick application we put together to show how you can use the compositing system with lights. There are six different light sources in the scene and a series of sliders so you can increase or decrease the contribution from the given light sources.
Rendering this scene to the quality level shown here can take at least several minutes. As you can see in the video the lighting levels can be updated instantly when using compositing instead of re-rendering the content. The sliders start at 1.0, where the lights are at their default level. All the way to the left turns off the light (0.0) all the way to the right doubles the contribution (2.0).
In the case of lighting, we are able to produce identical results to actually re-rendering the scene, even when increasing the lighting contribution beyond what the scene was originally rendered with. When setting up the scene you can either break out individual lights or assign the handle to the base light and have all of its instances grouped together. You can also assign the handle to instances which have emissive materials on them rather than explicit light sources (the cove lighting in the demo is setup like that).
This type of system is very useful for testing different lighting configurations or for demonstrating dimming and control systems. You could also even use multiple IES files (light profiles) at the same location to render different lighting options and switch between them, there are a lot of possibilities. Next we’ll talk about the details of how to actually use the compositor for lighting in your application.
The sequence of commands needed to use the compositing system with lighting is identical to that used for material changes, only some of the parameters needs to change. So we’ll be calling compositor_render_components to generate the data, compositor_prepare_composite to get it setup and then compositor_composite_components to generate the images. Here is a look at the details.
Here is the command used to render the compositing data used in the above demo.
{"jsonrpc": "2.0", "method": "compositor_render_components", "params": {
    "allow_texturing" : false,
    "lights": [
        "light_stage_spot",
        "light_ceiling_batten",
        "light_recessed_dome",
        "light_stair_led",
        "light_stair_ceiling",
        "light_coves"
    ],
    "lights_are_handles": true,
    "composite_name" : "Conference_hall",
    "render_context_timeout" : 20,
    "save_to_disk" : true,
    "scene_name" : "ex_scene"
}, "id": 1}
Instead of specifying an elements array we provide a lights array. This is simpler than the elements array used for materials on objects and is just an array of strings. How it is interpreted depends on the value of lights_are_handles. If true then the strings represent the value of the handle String attribute on light sources or light source instances you want to separate. This is great when you want to group together multiple light sources or easily manage the lights using the handle attribute. If false then the strings are assumed to be the name of an instance of a light source you want to separate (or instance of a group containing light sources), this is more useful for addressing specific lights.
While we don’t stop you from doing it, using the allow_texturing paramter doesn’t make much sense for lighting compositing, so if you try that use at your own risk. Running the above command will render all of the image data needed for compositing and store it on disk to be used later. For a more detail on the process please see the previous post. Just like before, after rendering you need to prepare the composite before using it.
This step is almost identical to the previous post. When we perform the compositing we create a very simple scene with a single polygon in which the textures representing the composite are mapped. While this happens very quickly it does not make sense to do it each time you change a parameter and reproduce a composited image. To that end we have the compositor_prepare_composite command which does everything needed to get the composite ready to produce images. It is very simple and looks like this.
{"jsonrpc": "2.0", "method": "compositor_prepare_composite", "params": {
    "composite_name" : "Conference_hall"
}, "id": 1}
Where Conference_hall is of course the name of the composite you created earlier with compositor_render_components. If the composite is already prepared then the command will do almost nothing and return, so there is no harm in just calling it more often than you need. Once called you can make subsequent calls to the compositor_composite_components command as many times as you wish. If you try to do that before preparing you will get an error.
The command also returns useful information, including the operation_template which specifies what things are available to be changed within the composite. For example:
{
    "data": {
        ...
        "operation_template": {
            "camera_attributes": {},
            "lights": {
                "light_ceiling_batten": {},
                "light_coves": {},
                "light_recessed_dome": {},
                "light_stage_spot": {},
                "light_stair_ceiling": {},
                "light_stair_led": {}
            },
            "objects": {}
        },
        ...
    }
}
There is a lot of other data returned but the operation_template is the most useful. In this case it shows us that there are lights that have been separated that we can modify and the names of what is available to change.
Here is where we finally make actual images. If you run this command without first calling compositor_prepare_composite then you’ll get back an error. Assuming the composite is prepared you need to tell the system what you want to change in the image, here is an example of calling this command for a lighting composite.
{"jsonrpc": "2.0", "method": "compositor_composite_components", "params": {
    "composite_name" : "Conference_hall",
    "samples": 1,
    "resolution" : {
      "x" : 512,
      "y" : 512
    },
    "operation": {
        "camera_attributes": {},
        "lights": {
            "light_ceiling_batten": {
                "tint": {
                    "r": 1.0, "g": 1.0, "b": 1.0
                }
            },
            "light_coves": {
                "tint": {
                    "r": 1.0, "g": 1.0, "b": 1.0
                }
            },
            "light_recessed_dome": {
                "tint": {
                    "r": 1.0, "g": 1.0, "b": 1.0
                }
            },
            "light_stage_spot": {
                "tint": {
                    "r": 1.0, "g": 1.0, "b": 1.0
                }
            },
            "light_stair_ceiling": {
                "tint": {
                    "r": 1.0, "g": 1.0, "b": 1.0
                }
            },
            "light_stair_led": {
                "tint": {
                    "r": 1.0, "g": 1.0, "b": 1.0
                }
            }
        },
        "objects": {}
    }
}, "id": 1}
So as with material compositing you give it a composite_name and an operation. The operation is what actually does the work, the structure is based on the operation_template discussed earlier. There are also many other options for setting resolution, controlling lights, tone-mapping and the image format returned. Refer to the command documentation for full details.
This particular example will actually just give back the same image as though we had rendered it without any compositing since all of the tints are set to 1.0. As you can see though, it is possible to adjust not just the intensity but also the colour of the different light sources by independently altering the RGB components. The tint is effectively a multiplier. So if you had a luminaire with an output of 1000 lumens and you give it a tint of 0.5, 0.5, 0.5 then the result will be as though the output was reduced to 500 lumens.
If you wanted to switch between different lights in the same position you can set the tint of one to 0.0, 0.0, 0.0 and the other to whatever intensity multiplier you like.
The command itself returns a image binary, just like the regular render command does.
The individual components generated by the pre-rendering steps are shown below as well as the final combined image, which as discussed is identical to results obtained through normal rendering.
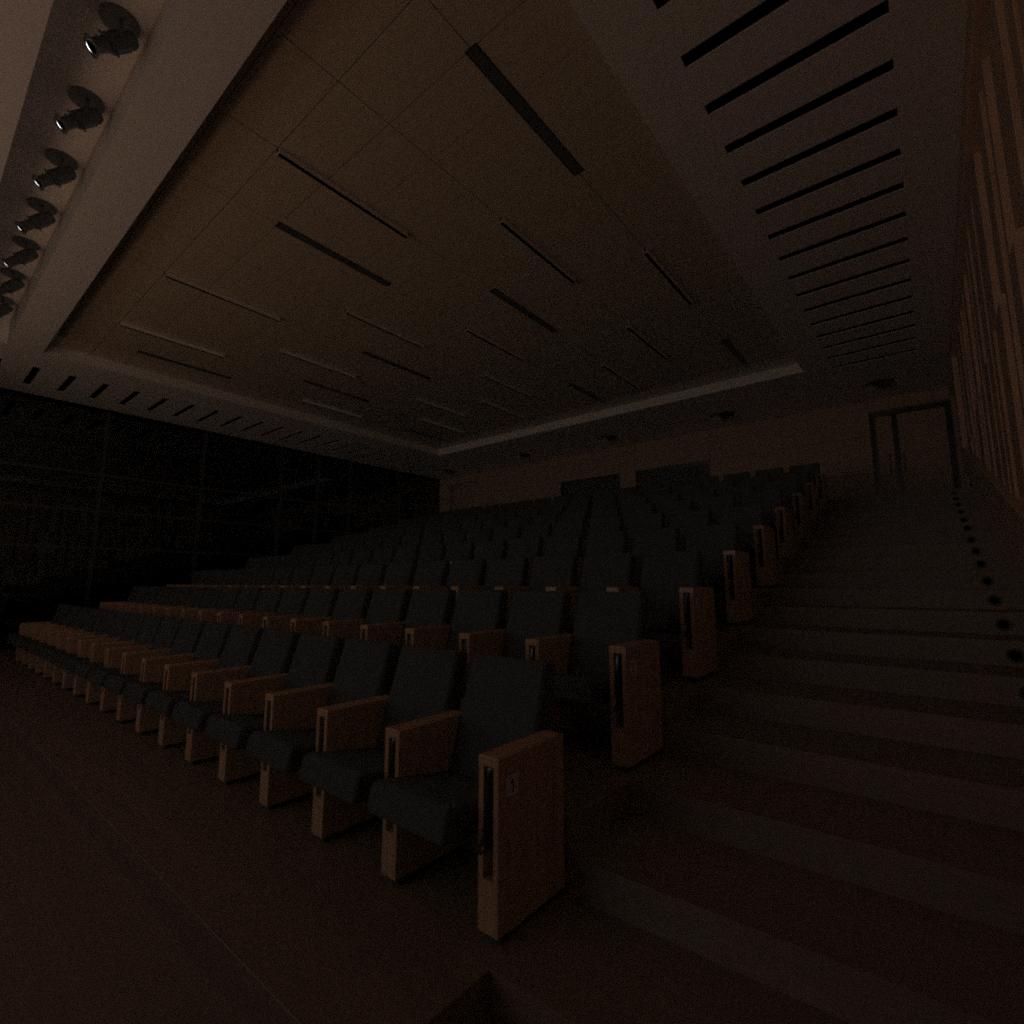
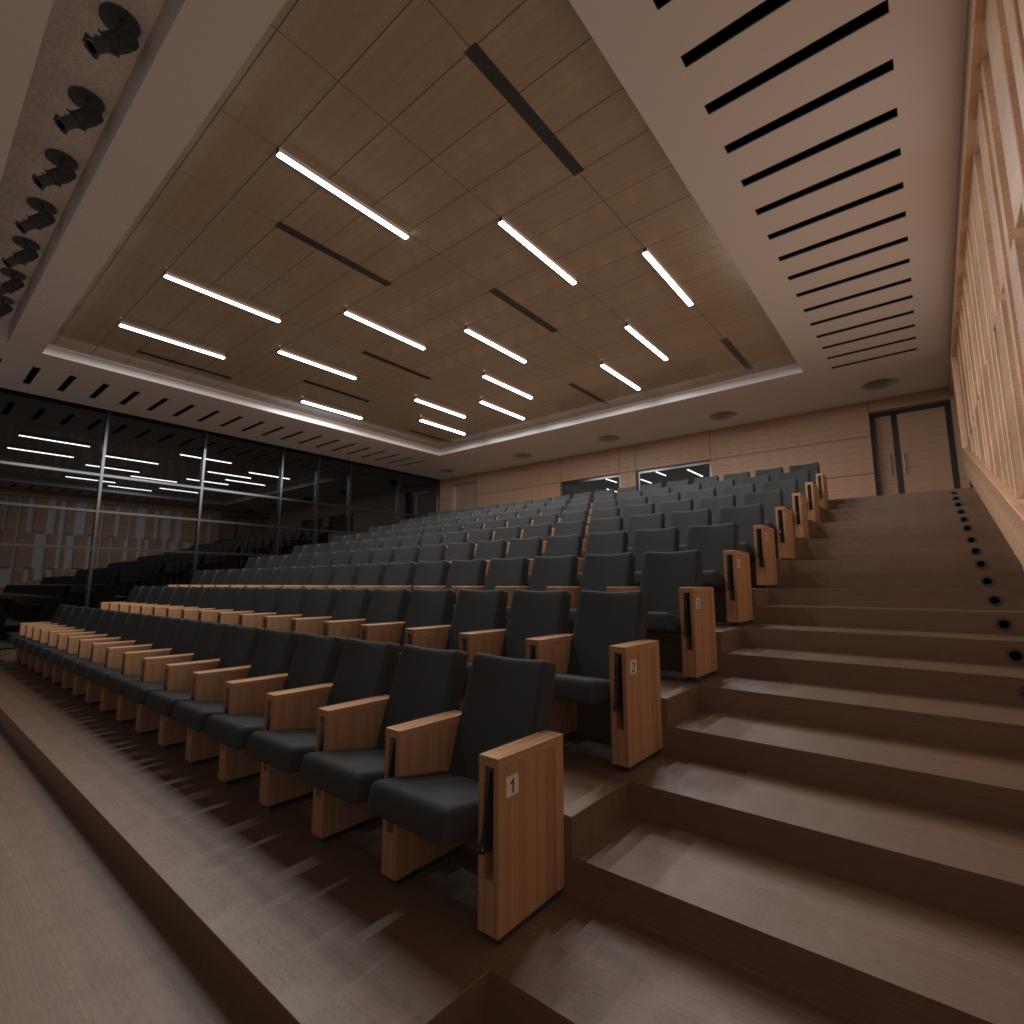
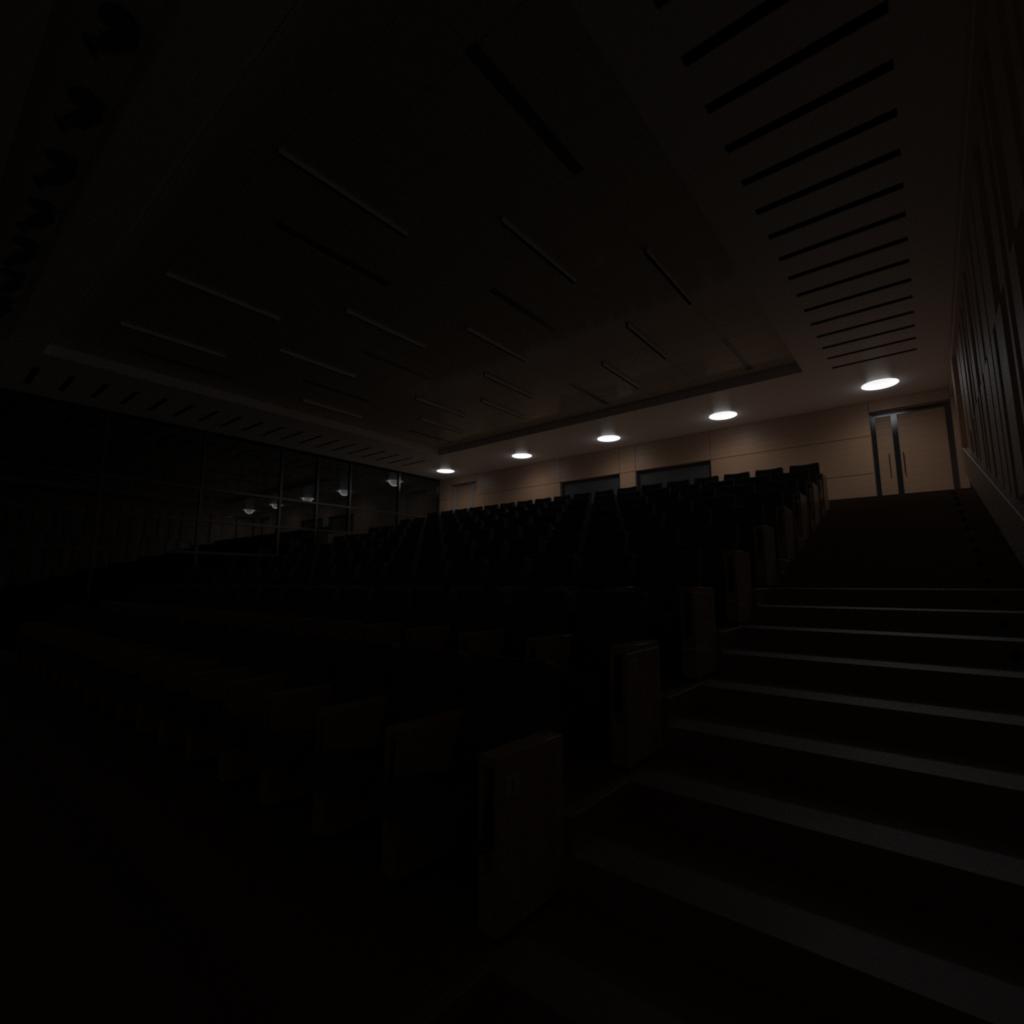
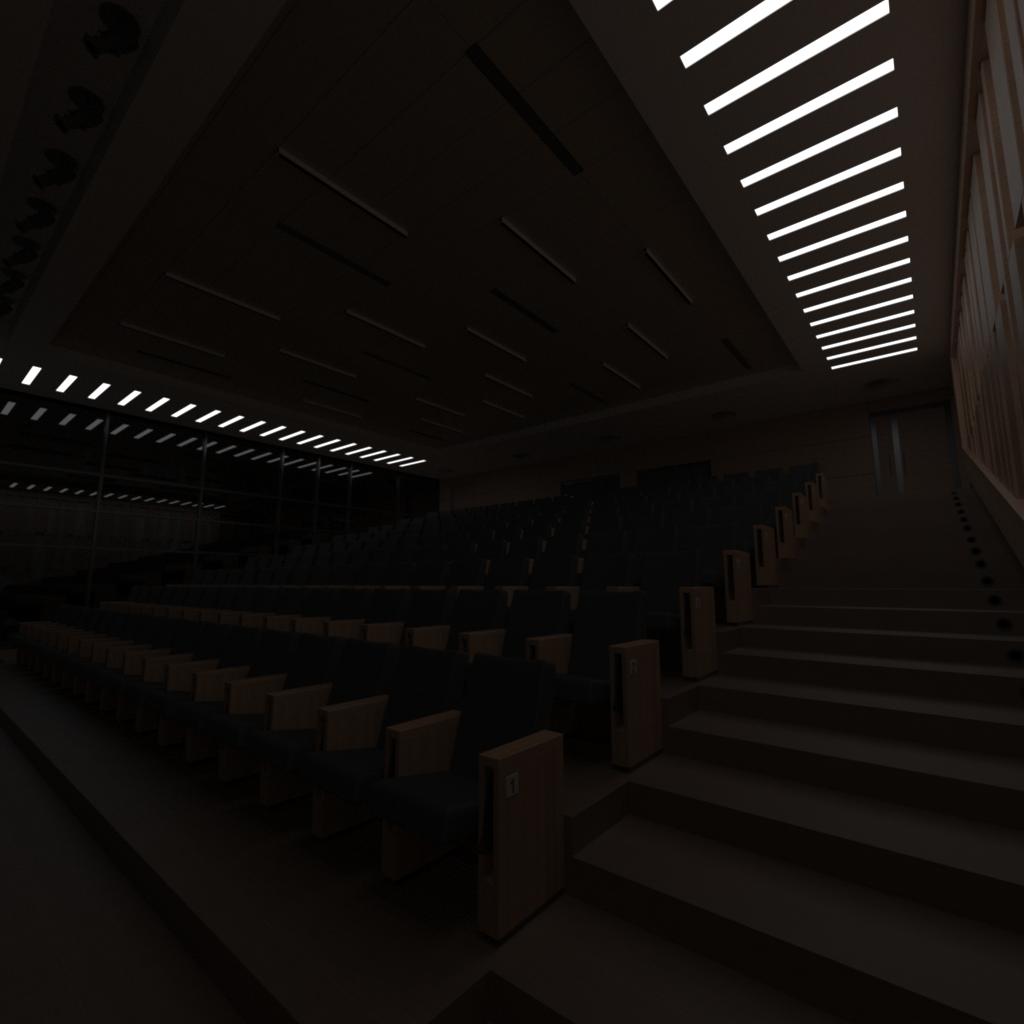

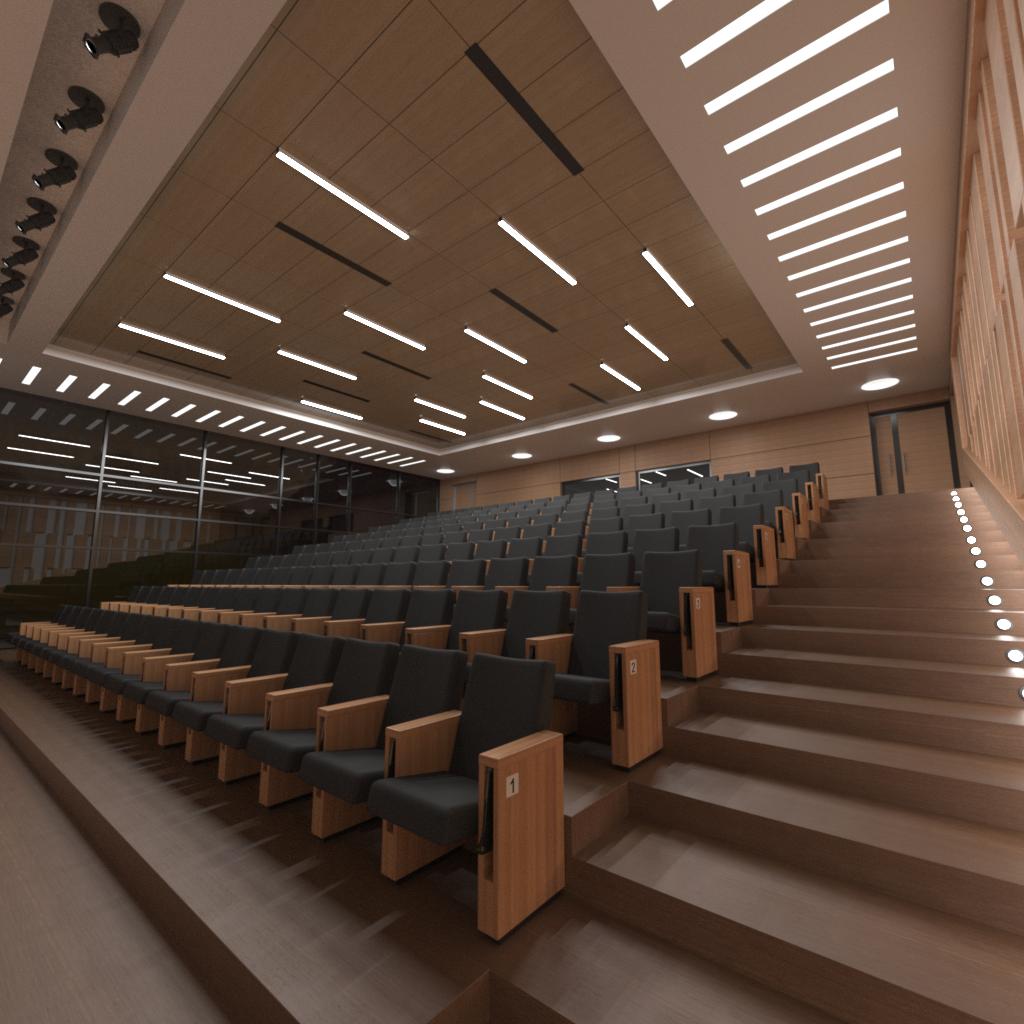
These are the layers used during the compositing process. As with the material setup all of these layers are generated in a single rendering pass so do not introduce additional rendering time.
Documentation for the compositing system can be found in your RealityServer Document Center under the Getting Started → RealityServer Features → Compositor section. Here you will find more detailed information on each command and the system in general.
This article shows a simple use case for lighting compositing but you can of course go much further. As mentioned one approach could be to have multiple light source types (with different profiles) that you can switch between. By modifying the JavaScript V8 commands for the compositing system you could even extend it to allow irradiance/illuminance data to be composited since it is possible to use LPEs with the irradiance canvas as well. This would allow you to show false colour visualisations for example. We’d love to hear more about what you are doing or would like to do with the lighting compositor feature so don’t hesitate to get in touch.
Paul Arden has worked in the Computer Graphics industry for over 20 years, co-founding the architectural visualisation practice Luminova out of university before moving to mental images and NVIDIA to manage the Cloud-based rendering solution, RealityServer, now managed by migenius where Paul serves as CEO.