NVIDIA Iray 2015 will introduce some great new features, including the ability to write your own procedural functions for use in materials. This is fantastic for creating resolution independent effects which can cover large areas without noticeable tiling artifacts (unless you want them of course). Iray is built into our RealityServer product so I love to test out its latest features. To put procedural functions through their paces I decided to try to emulate something procedural from my childhood, the now famous 10 PRINT program. This little one liner, originally designed to demonstrate the capabilities of the Commodore 64 prints a maze by randomly alternating between two diagonal characters. Iray uses the NVIDIA Material Definition Language (MDL) both to define materials as well as custom functions, if you haven’t tried it out this little tutorial is a great way to get started.
10 PRINT appears extremely simple on the surface but hides considerable complexity. In fact an entire book has been written exploring this single line of code from every angle. I highly recommend picking up a print copy and supporting the authors who have intricately documented this little piece of computing history. Here is the program in its full glory:
10 PRINT CHR$(205.5+RND(1)); : GOTO 10
When you run this program it will character by character fill your screen and very soon a maze like pattern will emerge. If you are not lucky enough to have a C64 laying around there are some great emulators. What a perfect candidate for testing procedural pattern generation in Iray!

10 PRINT Running in an Emulator
mdl 1.1;

using df import *;
using state import *;
using base import *;
using tex import *;
using math import *;

export texture_return tenprint() {
	color result = color(1.);
	return texture_return(
		result,
		luminance(result)
	);
}

export material tenprint_example (

) = let {

	bsdf diffuse_bsdf =
		diffuse_reflection_bsdf(
			tint: tenprint().tint
    	);

} in material(
	surface: material_surface(
		scattering: diffuse_bsdf
	)
);
Let’s start with a bit of MDL boiler plate. Since we are creating a procedural function rather than a material we really need to have a simple material to wrap it in so we can test the output as we develop. Currently there are no interactive tools for creating MDL so the easiest way to test is to edit and reload in the NVIDIA Iview2 tool. To the left you can see our initial material, right now it just provides a diffuse material with its colour set to pure white (incidentally, you should never use pure white since that would never occur in real life). If you don’t know MDL you can check out the documentation for more details and an introduction.
You can see we have already put in a stub function for our 10 PRINT procedural. For now it takes no parameters and just returns our white colour. As we proceed we will only show the code for this function, towards the end we will show how it integrates back into the material. We have imported the df, state, base, tex and math modules with the using syntax so we don’t need to prefix calls to functions in these modules. Not all of these modules are used yet but we will need them later.
The first thing I needed to verify to implement 10 PRINT was that I would be able to randomise the choice of diagonal character. This wasn’t immediately obvious since MDL does not have a simple function to generate random or quasi-random numbers. For my purposes something that looks random is sufficient. I am not trying to emulate how 10 PRINT actually runs on the C64 but rather just the results it generates. MDL functions must be able to compute and return everything they need based only on the input parameters and the state provided by the renderer. They have to be side effect free which means sometimes having to find alternative solutions.
export texture_return tenprint(
	texture_coordinate_info uvw
		= texture_coordinate_info()
) {
	return(
		perlin_noise_texture(
			color1: color(1),
			color2: color(0),
			size: 0.02,
			noise_levels: 4,
			uvw: uvw
		)
	);
}
While MDL does not have a built in feature for random number generation, it does have functions for generating noise patterns, specifically Perlin Noise. This would seem to be suitable for getting something random looking to drive our algorithm. So let’s modify our initial stub function to return some noise based on the perlin_noise_texture function available in the base module. On the left you can see our first attempt at this. We have added a parameter to our function to accept UV texture coordinates which will become important later on. Selecting a suitable value for the size parameter is a matter of trial and error, after some tests I arrived at the number shown here. I recommend setting noise_levels to at least 4.
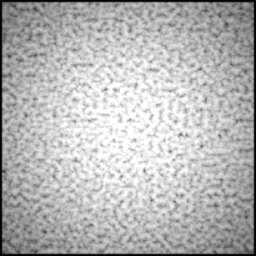
Output of Perlin Noise from the Function Above
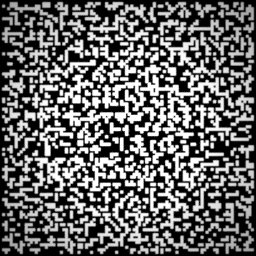
Noise with Modified UV and Thresholding from the Function Below
export texture_return tenprint(
	texture_coordinate_info uvw
		= texture_coordinate_info(),
	uniform float tiling = 100.0
) {

	texture_coordinate_info tiled_uvw
		= transform_coordinate(
			transform:
				rotation_translation_scale(
					scaling: float3(tiling)
				),
			coordinate: uvw
		);

	float rnd = perlin_noise_texture(
		color1: color(1),
		color2: color(0),
		size: 0.02,
		noise_levels: 4,
		uvw: texture_coordinate_info(
			position: floor(
				tiled_uvw.position
			) / tiling
		)
	).mono;

	if(rnd > 0.5)
		return(
			texture_return(
				color(1.), 1.
			)
		);
	else
		return(
			texture_return(
				color(0.), 0.
			)
		);
}
This gives us some nice fairly random looking noise, however we need to turn this into something that can give a random looking selection between two choices. We also want to keep the choice constant within a character block so we don’t randomly switch characters within a single character. So what we want to get to is basically a black and white noise with a blocky appearance. To achieve this I have added another parameter for tiling, this will control how many characters we want to show in the [0,1] UV space. Once scaled, the UV coordinates start giving values outside the [0,1] range, to get a blocky appearance we discard the fractional part of the tiled UV coordinates with the built in floor() function then divide out the tiling.
Now the noise will give a blocky appearance but it’s still a smooth gradient of brightness between the blocks, we need them to be on or off. We can do this easily by just thresholding the noise and outputting one colour if the threshold is met and another if it’s not. Since I setup the noise between black and white I take a threshold of 0.5, this value can have a big effect on the look of the noise and is worth breaking out as a parameter you can tune. With both of these elements in place we now get a nice black and white pixelated result.
Many implementations of 10 PRINT in modern software improve on the original with anti-aliasing, vector graphics and other enhancements. In contrast I wanted to replicate the original appearance including the low resolution encoding of the characters. The C64 character map encodes each PETSCII character in 8×8 pixels, in the default mode each pixel is basically either on or off. 10 PRINT works by randomly adding either 0 or 1 to the 205 character code. It’s a happy coincidence that these characters happen to be adjacent in the PETSCII table.
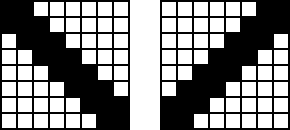
PETSCII Characters, Left: 205, Right: 206
I first considered using textures for the characters however it can be tricky to stop Iray from filtering them which would destroy the effect I wanted to achieve. Since there was only 64 values for the character I decided instead to just encode it within a local array of booleans in the function. MDL does not support multi-dimensional arrays so I’ve encoded it in a linear array.
bool[64] slash = bool[64](
	true , true , false, false, false, false, false, false,
	true , true , true , false, false, false, false, false,
	false, true , true , true , false, false, false, false,
	false, false, true , true , true , false, false, false,
	false, false, false, true , true , true , false, false,
	false, false, false, false, true , true , true , false,
	false, false, false, false, false, true , true , true ,
	false, false, false, false, false, false, true , true
);
You might have noticed I didn’t show both characters. We can actually easily obtain the second character by horizontally flipping the first. This means our random choice will be whether or not to horizontally flip the character when we draw it. Before we get there, we first need to actually lookup the elements in the character and draw them based on where we are in the UV space. First let’s just work out how to draw a repeating diagonal character, the one encoded into the slash array. Here is how the index is computed.
int row_length = 8;
int u = frac(tiled_uvw.position[0]) * row_length;
int v = frac(tiled_uvw.position[1]) * row_length;
int idx = u + (v * row_length);
The row_length refers to the width of our character, which I have set to 8 since the C64 character is originally 8 pixels wide. Then I calculate an adjusted UV index by taking just the fractional part of the tiled UV coordinates (where as for the random noise we took the whole number part). This causes the character to repeat, while the noise does not repeat but stays constant within a character. Finally I compute the linear position in the array from the U and V index. This all tells us which pixel of the character to output. Of course, in its current state this will always output the same character, which wouldn’t be much value. So we’ll now add the magic line which makes it behave like 10 PRINT.
int row_length = 8;
int u = frac(tiled_uvw.position[0]) * row_length;
if(rnd > 0.5) u = row_length - u - 1;
int v = frac(tiled_uvw.position[1]) * row_length;
int idx = u + (v * row_length);
Now we can output characters since we know whether to draw an area as on or off so we can return a result based on this. Here I just return the C64 default foreground or background colour depending on whether we should draw a solid pixel in the character or not. At this point, with all of the elements together we can start to generate some output that really does resemble the original 10 PRINT program. Just a note, when looking at these top-down images, the shading you see is due to the light source above the plane, not our procedural function.
if(slash[idx])
	return(
		texture_return(
			color(0.0, 0.246200, 1.0), 1.
		)
	);
else
	return(
		texture_return(
			color(0.0 ,0.0 ,0.401978), 0.
		)
	);
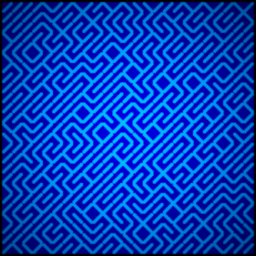
10 PRINT Rendered with Iray 2015
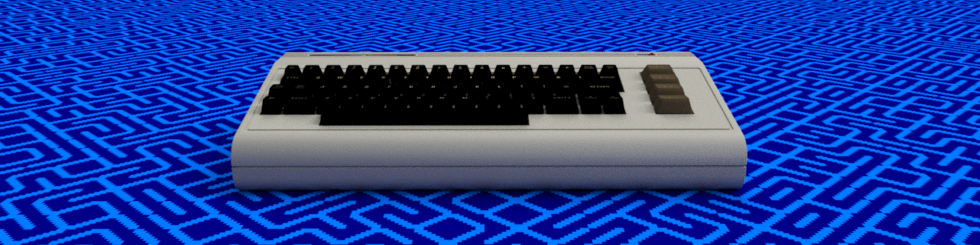
Example render with Iray 2015 and the material on the ground plane
There is a lot you could do to improve on this little example. I haven’t exposed any significant parameters to allow you to tune the settings (such as the foreground and background colour) and the parameters which drive the noise could also be important to expose. You can see however that even in its simple form we get a great result, when you zoom in you can see the hard edges for the character pixels exactly as intended and we get a result that looks quite random despite using the deterministic Perlin noise.
Alternatives to using the internal Perlin noise function of Iray would be to port a Linear congruential generator to MDL or perhaps even better to port Stefan Gustavson’s GLSL noise implementations which are actually very easy to translate to MDL (basically replace vecN with floatN, swap mix for lerp and fract for frac). There is a lot of good material out there and the requirements for doing noise in MDL are very similar to using languages like GLSL.
Of course, my implementation here isn’t very flexible, we can’t experiment with different characters or reproduce the many variants of 10 PRINT shown in the book. You could take it much further but that is definitely left as an exercise for the reader, unfortunately I can’t see many customers generating demand for C64 procedurals but this new programmability in Iray opens a lot of new doors for our users. We’d love to hear more about how you might use this functionality so please contact us if you want to know more.
 Download the Complete MDL File.
Paul Arden has worked in the Computer Graphics industry for over 20 years, co-founding the architectural visualisation practice Luminova out of university before moving to mental images and NVIDIA to manage the Cloud-based rendering solution, RealityServer, now managed by migenius where Paul serves as CEO.